Evaluate and notate symptoms (all installed browsers, common malware, installed programs, customer stated symptoms, etc) on the ticket.
2. macOS: Initial Customer Involvement
Because of the way macOS is structured, you'll need to keep your customer on the line for the first part of troubleshooting.After you've dealt with a few initial checks, you'll be able to let your customer go, and complete the system cleanup.
macOS passwords are necessary for removing software, and gaining root terminal access. This means you'll need to work with your customer on the first pass of their system. This keeps them safe; they never have to divulge their password to you, as they'll be there through the entire time it would be necessary to have it.
Keep your customer on the line, and this guide will let you know when you no longer need their help.
3. macOS: Malware Check - Applications and Utilities
Unlike Windows, for the most part macOS displays apps and utilities without much, if any obfuscation.
Quit Open Apps
Look on the dock for any items with a dot beneath; this indicates they are open.
You cannot quit Finder. It provides the 'shell' you're using; the Desktop, Dock, etc.
Select each app, and choose App Name > Quit on the menu bar at top until only Finder is left open. Selecting the red dot in the corner does not quit a program, but just closes a window.
Check Applications
Select Finder.
Select Go > Applications.
Look through the list of Applications for anything suspicious. Again, you're looking for things similar to what you'd find on Windows; Buyer, Logger, etc. are all keywords to look for.
If you are unsure of an application, search for it on Google. Try "mac <name of application>" or "mac <name of application> virus".
Ask your customer if they are familiar with the application, or if they use it regularly.
Make note in your ticket of any suspicious applications.
Trash Malware
For any obvious items in Applications or Utilities:
Grab, drag, and drop the Application icon to Trash at the end of the dock.
If prompted for a password, it is the Mac's password.
Follow any prompts the software may provide to complete the uninstall.
Make note in your ticket of any applications you trash.
Check Utilities
Select Finder.
Select Go > Utilities.
Look through the list of Applications for anything suspicious. Again, you're looking for things similar to what you'd find on Windows; Buyer, Logger, etc. are all keywords to look for.
If you are unsure of an application, search for it on Google. Try "mac <name of application>" or "mac <name of application> virus".
Ask your customer if they are familiar with the application, or if they use it regularly.
Make note in your ticket of any suspicious applications.
Trash Malware
For any obvious items in Applications or Utilities:
Grab, drag, and drop the Application icon to Trash at the end of the dock.
If prompted for a password, it is the Mac's password.
Follow any prompts the software may provide to complete the uninstall.
Make note in your ticket of any applications you trash.
4. macOS: Startup Check
Select the Apple menu, then select System Preferences.
Select Users & Groups.
Select the Lock in the corner to unlock these settings.
Enter the Mac password, and select Unlock.
Select the Login Items tab.
Look through the list of Applications for anything suspicious. Again, you're looking for things similar to what you'd find on Windows; Buyer, Logger, etc. are all keywords to look for.
If you are unsure of an application, search for it on Google. Try "mac <name of application>" or "mac <name of application> virus".
Ask your customer if they are familiar with the application, or if they use it regularly.
Make note in your ticket of any suspicious applications.
Remove Malicious Items
For any malicious items, highlight the entry, then select the Minus button in the bottom left.
Make note in your ticket of any items you remove.
5. macOS: Ready Tools
Quit Open Apps
Look on the dock for any items with a dot beneath; this indicates they are open.
You cannot quit Finder. It provides the 'shell' you're using; the Desktop, Dock, etc.
Select each app, and choose Application Name > Quit on the menu bar at top until only Finder is left open. Selecting the red dot in the corner does not quit a program, but just closes a window.
Terminal
You'll be doing much of your work from a terminal interface. You will need root access, which requires the customer's password.
Select Spotlight from the menu bar.
For Spotlight Search, type in Terminal.
Select Terminal from the list.
Terminal will open.
Type in sudo -i and press return or enter.This requests an interactive sudo session, so you can continue to type commands as root for as long as its open.
Have the customer enter their password, and press enter or return.Having the customer enter this information keeps them safe; you do not need to know what their password is at any time.
No * or other markers will appear when entering the password. This is by design, so it can't be guessed. Simply type in the password and press return, it will work.
You'll be presented with a root prompt. You can tell because the prompt icon is now a #, rather than $.
Do not close this terminal window. You will need it multiple times while you are hunting for malware. You can safely minimize it with the yellow dot in the corner if you wish.
Activity Monitor
Useful utility to help visually scan what's running on the system.
Select Spotlight from the menu bar.
For Spotlight Search, type in Activity Monitor.
Select Activity Monitor on the left.
In Activity Monitor, sort by PID (Process ID). This makes it easier to see the start-up order of the processes to begin with, so you can more easily find errant programs.
6. macOS: End Customer Involvement
At this time, you no longer have need for your customer's password, or their involvement in the troubleshooting process.
It's safe to let your customer know that you'll be working on their machine for a bit, they are welcome to watch, and you will call them back or leave a note on screen when you're done.
7. macOS: Malware Check - Activity Monitor
Activity Monitor is like Process Explorer in Windows. It gives you a visual, clickable way to look through the running applications on the system, though it is limited to current user only.
We'll be using it primarily to find things to investigate later.
Much like in Windows, look for common malware keywords: "Buyer", "Logger", "Script", etc.
If you see something, double click on it.
Select Open Files and Ports.
Here, you'll see a list of all resources the application is using. Specifically, you're looking for a 'directory' ending in .app. macOS uses a compressed 'file' as directories for the apps, so further information is just the program calling various resources it uses.
In this example, the file we'd look for is "Script Editor" inside the /Applications/Utilities/ directory.
If you see any odd items, make note of their location and PID for further use later. Record this directly into your notes. You'll be killing these programs from the terminal in the next step.
Don't close your tools. The guide will alert you near the end when it's safe to exit out of everything.
8. macOS: Kill Malware From Terminal
Overview
Look at your notes for what you've seen so far in Activity Monitor, and from the programs you deleted and made note of. Those are your targets for the next steps.
PS & GREP
ps (Process Status) lets you see further information about a running program.
grep (Global Regular Expression Print) lets you match a pattern in text.
In general, we'll use ps to list all running processes, then narrow it down to just what we're looking for using grep.
Command Format
ps -A | grep -i <target>
All commands at the terminal are Case Sensitive!
ps list processes.
-A list all processes, it is capitalized.
| Funnel the output of the first command into the second.
grep search for a regular expression.
-i case insensitive search, so in our search the letter "A" is the same as the letter "a".
<target> what we're looking for. If you have a space in your search, you must "escape" it with a backslash \. To search for "Script Editor", you'd put in Script\ Editor.
Process
Locate All Copies
In your Root Terminal:
Verify you have all copies of the program in question by searching for it. ps -A | grep -i <target>
Repeat this for every program you've identified so far in your notes. Record the PID (the first number) for each of these. Put this in your ticket notes.
You will notice your grep command is also in the results list, ignore this entry.
It's normal to not find a program you've already deleted when you were clearing out Applications and Utilities.You don't need to go any further if the only result you find is your grep command.
Kill Applications
It is always best to try to kill programs 'nicely' first, so they don't end up with a bunch of abandoned 'child' programs that can cause problems later.
Issue a killall <target> command.
This will attempt to be "nice" and let programs close properly, plus, it will attempt to close all copies of the program.
Re-run the ps -A | grep -i <target> command to make sure it's closed.
If the program is still running, or killall can't kill it, try a regular kill <pid> command.
Re-run the ps -A | grep -i <target> command to make sure it's closed.
If both killall and kill won't end the program, you can issue a SIGKILL that cannot be ignored using kill -9 <pid>.
Repeat this process for every application you've identified so far.
9. macOS: Malware Removal - Directory Checks
Overview
macOS stores programs only in certain areas, as only some directories are allowed to execute programs from in the first place.
We'll be checking over certain directories for signs of malware using the terminal, simply because typing is faster than setting up Finder to show everything, plus we want to minimize changes to the customer's setup.
Command Overview
The major commands we'll be using are cd and ls -al.
cd Change Directory.
ls List directory contents.
-a show all.
-l long list format.
pwd Show the full path you're currently in.
Directories
All directory names are Case Sensitive!
The following system locations need to be checked for malware:
/Library/Application Support/
/Library/LaunchAgents/
/Library/LaunchDaemons/
/Library/PrivilagedHelperTools/
/System/Library/Frameworks/
The following User locations should be reviewed for malware, but it is okay if you don't find anything in one or more of these locations, or even find the directory itself.
/Users/<USERNAME>/Library/
/Users/<USERNAME>/Library/Application Support/
/Users/<USERNAME>/Library/LaunchAgents/
/Users/<USERNAME>/Library/LaunchDaemons/
/Users/<USERNAME>/Library/PrivilagedHelperTools/
/Users/<USERNAME>/Library/Frameworks/
When entering a directory at the prompt, you must 'escape' all spaces. /Library/Application Support/ would be typed in as /Library/Application\ Support/.
Refer to the Process, below, for how to check these directories properly.
Navigation Help
Tab auto-complete is enabled by default on most Mac Terminals. Start filling in a command, then press the <TAB> key. For example, if you type /Lib, you can then press <TAB>, and it will fill out to /Library/.
If you are entirely uncomfortable looking through directory listings in the Terminal, you can open a location by doing a cd to the directory, then typing open .
If you're ever in doubt what directory you're in, type pwd to show the current directory path in full.
Process
cd to each directory, then type ls -al.
Look through each directory carefully and locate items that don't sound or look right. Again, standard keyword apply, just like under Windows; "Logger", "Buyer", etc.
If you are not sure of something, search for "Mac <name of directory>" or "Mac <name of directory> virus" in Google.
Repeat for every directory listed above that you need to check. You may or may not find some of the directories in /Users/<USERNAME>/. This is normal.
Make note of the full directory name to delete in a moment. Record the full directory in your ticket notes.
10. macOS: Delete Malware From Terminal
Overview
You are using a root terminal. Be exceptionally careful with all commands; they cannot be undone and can cause severe damage to the operating system.
Deleting from the Terminal
There is no safety net of the Trash when it comes to these commands. They do not prompt to ask if you are sure. Be absolutely certain by checking your commands multiple times before pressing enter.
rm deletes a file.
-r deletes everything inside a directory, recursively, then deletes the directory.
It's best to specify the entire path each and every time you want to delete something this way. While it does slow you down, it forces you to double-check your work, and severely decreases the chances of a mis-key that can ruin a system.
Process
Using the list you generated, delete each file and directory in turn. rm <filename> rm -r <directory>Remember to double-check your command before pressing the enter key each and every time.
Repeat these commands for each directory and file you wish to delete.
Record the exact commands you used each time. Put this information directly into your ticket notes.
Alternate Method
While a bit safer, this method requires you to know the user's password, and it's a lot slower.
Open the directory for each file or directory you want to delete. open <directory>
Grab, drag, and drop the offending files and directories to the Trash.
Enter the user's password, and select OK.
Repeat for each file and directory you found previously.
Record the exact files and directories you deleted.Put this information directly into your ticket notes.
11. macOS: Networking Check
Select the Apple menu, then select System Preferences.
Select Network.
In Network, make sure the active network is selected (look for the green dot next to the connection), then select Advanced.
Select the DNS tab.
Verify the DNS servers listed are not malicious. They tend to be assigned by the ISP, and can be searched for using Google.
If you see an entry that's not proper, highlight the entry, and select the Minus button at the bottom.
Note any changes you make in your ticket.
12. macOS: Safari: Verify Browser
Open Safari.
Select Safari > Preferences from the menu.
On the General tab, verify the Homepage is not malicious.http://www.apple.com/startpage/ is the default.
On the Search tab, make sure the Search engine is not malicious.Google is the default.
On the Extensions tab, remove the check from any malicious Extensions.Search for extension names in Google if you are not sure.
On the Advanced tab, make sure the Style sheet isn't malicious.This is rarely set for any reason, and defaults to None Selected.
Make note of any changes you made.Put this information directly into your ticket notes.
Verify a new tab can be opened successfully, and go to an approved site to validate browser functionality. Verify adverts on site are non-malicious by checking the link to the ad and verifying that the options in the upper right are available.
Run a search for an approved search term through both the omnibox (built-in search) and through http://google.com, and click on the first search result to verify you arrive at the expected site.
Verify ad results using the approved Ad site.
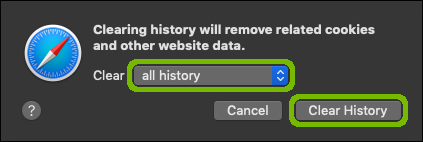
13. macOS: Safari: Clear Browser History
Open Safari.
Select the Safari menu, then select Clear History.
Select Clear all history, then select Clear History.
14. macOS: 3rd Party Browser Check
macOS does not necessarily have the icons for other browsers on the Dock.
Select Finder.
Select Go > Applications.
Look for other browsers, such as Chrome and Firefox in the list of Applications.
15. macOS: 3rd Party Browser Verification
Browser VerificationCheck other browsers for possible browser hijacks and redirects. Open multiple tabs to ensure we haven't missed anything. Clean up the browser if necessary. See below.
Accessing the menus and locations you need for Chrome and Firefox are identical on macOS as on Windows.
Firefox
Enter 'about:plugins' into address bar and hit enter.
Review plug-ins and remove any that are malicious.
Check 'settings'.
Remove any malicious extensions.
Remove any malicious services.
Verify Homepage is not malicious.
Verify a new tab can be opened successfully, and go to an approved site to validate browser functionality. Verify adverts on site are non-malicious by checking the link to the ad and verifying that the options in the upper right are available.
Run a search for an approved search term through both the omnibox (built-in search) and through http://google.com, and click on the first search result to verify you arrive at the expected site.
Verify ad results using the approved Ad site.
Chrome
Enter 'chrome://extensions' into address bar and hit Enter.
Review plug-ins and remove any that are malicious.
Check Settings.
Remove any malicious extensions.
Verify Homepage is not malicious.
Click on Manage Search Engines and verify no search hijackers are present.
Verify a new tab can be opened successfully, and go to an approved site to validate browser functionality. Verify adverts on site are non-malicious by checking the link to the ad and verifying that the options in the upper right are available.
Run a search for an approved search term through both the omnibox (built-in search) and through http://google.com, and click on the first search result to verify you arrive at the expected site.
Verify ad results using the approved Ad site.
16. macOS: Quit Tools
Look on the dock for any items with a dot beneath; this indicates they are open.
You cannot quit Finder. It provides the 'shell' you're using; the Desktop, Dock, etc.
Select each app, and choose File > Quit until only Finder is left open. Selecting the red dot in the corner does not quit a program, but just closes a window.
17. macOS: Restart
Many different problems can be solved simply by restarting your computer. This allows the operating system to clean up any open actions, as well as apply any pending updates completely.
From the menu bar across the top of the screen, select the Apple menu, then Restart...
18. macOS: Test Work
Verify Your Work
Attempt to bring up web pages in each browser.
Attempt to browse files.
Verify the problems reported by the user are no longer present.
Record notes on what you have tried directly in your ticket notes.
19. macOS: Empty Trash
Once a file is deleted from the Trash, it is gone forever. Be sure to check the files in the Trash before proceeding.
Select the Trash icon at the end of your Dock.
Select Empty in the top right corner.
You will be asked to confirm you wish to empty the Trash. If you are sure you do not want the files any longer, select Empty Trash.
20. Issue Resolved
Issue Successfully Resolved
The system is now working as intended. Issue resolved.
21. Guided Path not helpful.
22. Exit: Escalate to PTE
If you are a PST, follow the Escalation Process to PTE.
23. OSRI Guide Main
OSRI Guide Introduction
This Guided Path will walk you through the process of starting an Operating System Re-Install (OSRI).
Some tenants have different scope, processes and policies regarding OSRIs. Please move forward to the next step by choosing which tenant the customer is originating from.
Clicking this shortcut will mark this step as "Completed," and if you complete the next Guided Path, this Guided Path will be completed automatically
25. Cannot Complete (CC) /Not Resolved
26. macOS: Startup Check
Select the Apple menu, then select System Preferences.
Select Users & Groups.
Select the Lock in the corner to unlock these settings.
Enter the Mac password, and select Unlock.
Select the Login Items tab.
Look through the list of Applications for anything suspicious. Again, you're looking for things similar to what you'd find on Windows; Buyer, Logger, etc. are all keywords to look for.
If you are unsure of an application, search for it on Google. Try "mac <name of application>" or "mac <name of application> virus".
Ask your customer if they are familiar with the application, or if they use it regularly.
Make note in your ticket of any suspicious applications.
Remove Malicious Items
For any malicious items, highlight the entry, then select the Minus button in the bottom left.
Make note in your ticket of any items you remove.
27. macOS: Ready Tools
Quit Open Apps
Look on the dock for any items with a dot beneath; this indicates they are open.
You cannot quit Finder. It provides the 'shell' you're using; the Desktop, Dock, etc.
Select each app, and choose Application Name > Quit on the menu bar at top until only Finder is left open. Selecting the red dot in the corner does not quit a program, but just closes a window.
Terminal
You'll be doing much of your work from a terminal interface. You will need root access, which requires the customer's password.
Select Spotlight from the menu bar.
For Spotlight Search, type in Terminal.
Select Terminal from the list.
Terminal will open.
Type in sudo -i and press return or enter.This requests an interactive sudo session, so you can continue to type commands as root for as long as its open.
Have the customer enter their password, and press enter or return.Having the customer enter this information keeps them safe; you do not need to know what their password is at any time.
No * or other markers will appear when entering the password. This is by design, so it can't be guessed. Simply type in the password and press return, it will work.
You'll be presented with a root prompt. You can tell because the prompt icon is now a #, rather than $.
Do not close this terminal window. You will need it multiple times while you are hunting for malware. You can safely minimize it with the yellow dot in the corner if you wish.
Activity Monitor
Useful utility to help visually scan what's running on the system.
Select Spotlight from the menu bar.
For Spotlight Search, type in Activity Monitor.
Select Activity Monitor on the left.
In Activity Monitor, sort by PID (Process ID). This makes it easier to see the start-up order of the processes to begin with, so you can more easily find errant programs.
28. macOS: End Customer Involvement
At this time, you no longer have need for your customer's password, or their involvement in the troubleshooting process.
It's safe to let your customer know that you'll be working on their machine for a bit, they are welcome to watch, and you will call them back or leave a note on screen when you're done.
29. macOS: Malware Check - Activity Monitor
Activity Monitor is like Process Explorer in Windows. It gives you a visual, clickable way to look through the running applications on the system, though it is limited to current user only.
We'll be using it primarily to find things to investigate later.
Much like in Windows, look for common malware keywords: "Buyer", "Logger", "Script", etc.
If you see something, double click on it.
Select Open Files and Ports.
Here, you'll see a list of all resources the application is using. Specifically, you're looking for a 'directory' ending in .app. macOS uses a compressed 'file' as directories for the apps, so further information is just the program calling various resources it uses.
In this example, the file we'd look for is "Script Editor" inside the /Applications/Utilities/ directory.
If you see any odd items, make note of their location and PID for further use later. Record this directly into your notes. You'll be killing these programs from the terminal in the next step.
Don't close your tools. The guide will alert you near the end when it's safe to exit out of everything.
Remove Hidden Spyware In Minutes For Free
Detect and remove spyware, keyloggers, tracking cookies, and other
threats that slow down your PC or steal your data.
65+ Million Downloads
Spyware scanner with AI-powered detection engine + database
.png)