macOS Mojave was released on September 24th, 2018.
This guide will walk you through some of the changes and features you'll find in Mojave.
2. New Features
There are many new features available in macOS Mojave.
3. Theme
macOS Mojave introduces a new Dark Mode to provide a better viewing experience for some users. You can switch between Light and Dark whenever you want.
Select the Apple Menu, then System Preferences.
Select General.
At the top, you can choose the Light or DarkAppearance.
You can also look through the other options here to customize your Mac to look just the way you want it to.
4. More Information
There are a great number of further changes 'under the hood' to provide more usability, security, and privacy to the Apps you use daily on your Mac.
For further information on these changes, visit www.apple.com/macos/mojave/ with your web browser.
5. Dynamic Desktop
macOS Mojave introduces Dynamic Desktop; the image will change color and look to match the time of day you are using the computer.
Select the Apple Menu, then System Preferences.
Select Desktop & Screen Saver.
Select a background from the list of Dynamic Desktops, then select the type menu above.
Select Dynamic from the menu.
Your desktop background will subtly change color throughout the day, to reflect the light, direction, and if it's in sun or moonlight.
You may return to this option to make changes at any time.
6. Desktop Stacks
Desktop Stacks are a way to organize the files on your Desktop. Rather than having icons for every file on your desktop, your Mac will try to group files together automatically, and provide stacks you can expand and collapse, making it neater and cleaner.
Select Finder on your Dock.
From the menu bar at top, select View > Use Stacks.
Items on your desktop will 'collapse' into stacks, with simple names showing what is in each stack.
When you click on a stack, it will expand to show all the files in that stack.
You can turn this feature on and off at any time.
7. Take a screenshot
Screenshots are saved on the desktop of your Mac.
Use the Screenshot Tool
All of the options to capture screenshots are still available, and described below. In Mojave, a new screenshot tool has been added to make it easier to capture, as well as record your screen.
Press Command + Shift + 5 keys at the same time.
A menu bar will open, giving you easy access to capture your entire screen, a window, or an area of your screen, as well as record all or part of your screen.
Capture the entire screen
Press the Command + Shift + 3 keys at the same time.
Capture a portion of your screen
Press the Command + Shift + 4 keys at the same time.
Drag your cursor around the area you want to capture.
Capture a window
Press the Command + Shift + 4 keys at the same time.
Press the space bar to change the icon to a camera.
Click the window you want to capture.
8. News
Apple News provides a curated, simple way to access and read current news topics across a variety of sources.
Select News from your dock.
When you first open News, you will be given a brief overview of what the app does. Select Continue.
You can choose a category on the left and see the headlines, and read the articles on the right.
9. Stocks
Apple Stocks provides a simple way to monitor the companies you invest in, as well as stock tickers to watch the stock prices, combining a list of business news articles to go along with each.
Select Stocks from your Applications.
When you first launch Stocks, you will be given a brief overview of what the app does. Select Continue.
You can browse and add socks you wish to monitor on the left. The right displays the current stock prices as well as curated news stories about the company.
10. Home
Apple Home is a tool to access your various home automation devices from a single interface.
You can now access your Apple HomeKit system from your Mac, as well as from your iPad, iPod, and iPhone.
The Home application can be found in the Applications folder.
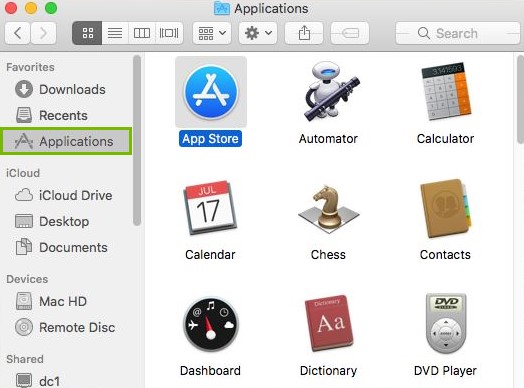
To Open the Applications Folder
Select Finder on your Dock.
Click Applications within the left column. All available application icons will be displayed.
11. Basic Setup for Your Apple HomeKit
We have a special guide setup to walk you through the process of setting up Apple Home.
Clicking this button will open a new guide that will provide you with steps to resolve your issue.
12. Voice Memos
Voice Memos provides a convenient way to make small recorded notes to yourself or others, and share them between your Mac, iPhone, and iPad.
Select Voice Memos from Applications.
The first time you open Voice Memos, a brief overview of what the app does is displayed. Select Continue.
You will see the large record button at the bottom to record your voice memo, as well as a list of any previous memos on the top left.
13. App Store Changes
The App Store has changed look, but not functionality; you can still visit to search for and find Apps for your Mac. Now, it is a bit easier to find what you are looking for, and has a new style.
From the Apple menu, select App Store.
When you first launch the App Store, a brief explanation of how it works is displayed. Select Continue.
You will find the list of categories and the search box on the left to help you narrow down what you're looking for. The Apps are listed in the larger area to the right.
14. Emoji Keyboard
The emoji keyboard allows you to easily pick the emoji, symbol, or object to put into your messages and documents to convey your feelings fast.
Select the Input menu on the top-right of your menu bar, near the clock.
Select Show Emoji & Symbols.
The Character Viewer will open, allowing you to pick out the symbol you want with ease from the categories lists on the left.
Remove Hidden Spyware In Minutes For Free
Detect and remove spyware, keyloggers, tracking cookies, and other
threats that slow down your PC or steal your data.
65+ Million Downloads
Spyware scanner with AI-powered detection engine + database
.png)